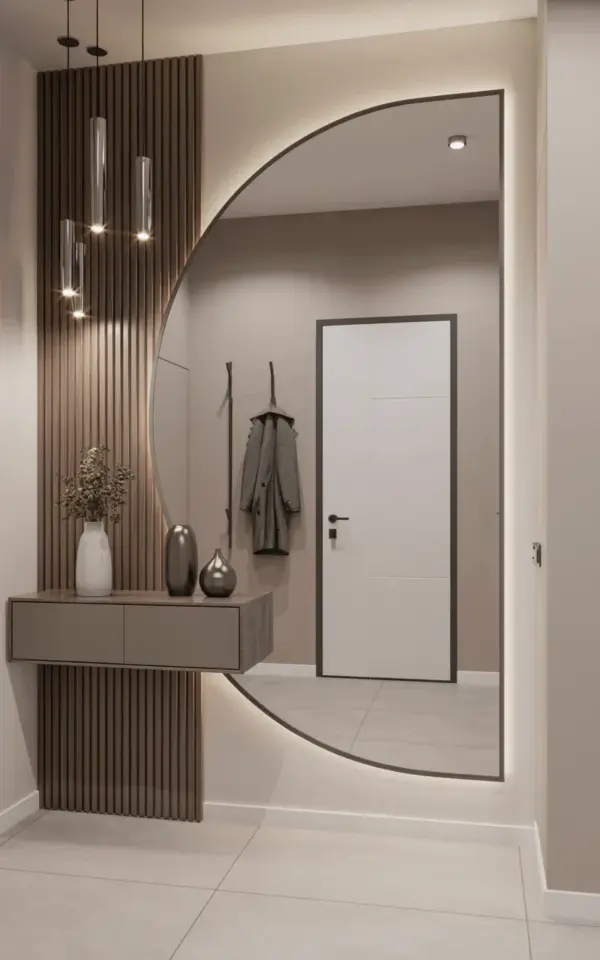
Ok, so you’ve seen the Pinterest photo. The one with the warm glowing curved mirror, the sleek wood slat wall, the floating console that looks like it cost a fortune. I’ve been there, staring at that saved folder and thinking there’s no way my cramped rental entryway could ever look like that. But here’s the thing: I did it. For under $200 and one slightly frustrating weekend.
That photo is the exact inspiration for my own small entryway makeover, and honestly, the end result looks way more expensive than it actually was. This entire budget entryway decor project came down to three key pieces: a fake curved mirror with LED lighting, cheap MDF planks for the wood slat wall, and a floating console I built from a single sheet of plywood. You don’t need a custom built-in or a fat renovation budget to pull off this look. You just need a little patience and the right tutorial.
### How to Fake an Expensive Curved Mirror on a Budget
Let’s talk about that mirror, the absolute star of the show. Original curved mirrors with integrated lighting can run you anywhere from $300 to over $1,000, which is absolutely insane for a piece of glass. Not gonna lie, I almost gave up on the idea entirely before I figured out the hack.
The trick is to buy a standard cheap arched mirror from a store like H&M Home or IKEA and create the illusion of a built-in shape. I attached my mirror directly to the wall and then framed it with a simple curved recessed area using drywall (or in my case, a thick piece of plywood cut into an arch). The real magic, however, is the LED lighting. I grabbed a strip of warm LED lights and adhered them to the back of the mirror frame, pointing them outward so they cast that soft glow against the wall. This creates the exact same effect as the high-end version, creating that “lit from within” look that seems to be everywhere on social media right now.
### The Wood Slat Wall Using Cheap MDF Planks
For the wood slat wall on the left side of the entryway, you don’t need fancy acoustic panels that cost $50 per square foot. Here’s what I did: I went to my local hardware store and bought standard MDF hardboard, the kind they use for pegboard without the holes. I had them rip the boards into 4-inch wide strips, which cost me around $35 total. It is a messy process to cut them, so ask the store to do it if you can, and be prepared for sawdust.
Installing them is straightforward, you just need to be methodical. I used liquid nails to glue them directly to the drywall and then nailed a single finishing nail at the top and bottom of each plank to hold them in place while the adhesive dried. I spaced mine about a half-inch apart, which has a super clean modern look. Just make sure your wall is totally clean and dry, because if it isn’t, those planks will pop right off. This project is very doable for a beginner but requires patience with the leveling, so take your time and get a good spirit level.
### Building the Floating Console Table for Depth and Storage
In the photo, that floating console sits perfectly on the slats, and it’s a brilliant way to add storage without taking up floor space. Buying one from Article or West Elm will set you back about $400. I built mine using a single sheet of 3/4-inch plywood and a simple Kreg Jig to make pocket holes. It is essentially just a large box with a face frame, which sounds harder than it actually is.
The key here is to mount it securely into the studs in your wall. Since it’s floating, it needs to be able to hold the weight of a vase, your keys, and maybe a bag without pulling out of the drywall. I used a French cleat system for mine, I cannot recommend this enough if you plan on putting anything heavy on top. It took me about two hours to build and paint, and it cost me roughly $20 in lumber. If you don’t have a Kreg Jig, you can buy a small one for $20 at Harbor Freight, or just use simple L-brackets hidden underneath the box, no one will ever see them.
### Styling the Details: Pendant Lights and Ceramic Vases
Now for the fun part, dressing it up. The photo shows three sleek silver pendant lights hanging from the ceiling. I found mine at a local Habitat for Humanity ReStore for about $10 each, but you can find similar ones at any thrift store. Don’t be afraid to hang them lower than you think you should. You want them to dangle in the negative space of the entryway to draw the eye down to the console.
On the table itself, the styling is minimal. I used a tall white ceramic vase with some dried pampas grass and a small stack of books. The color palette is grounded by two dark gray vases, which just anchor the whole display. Here’s a quick list of what works if you’re looking to replicate this:
– **Thrift stores** for vases that don’t match perfectly.
– **Dried flowers** from a dollar store, they last forever and cost nothing.
– **Art books** with neutral covers, just stack them for instant height.
– **Baskets** on the bottom shelf for hiding mail and shoes.
– **A single small plant** on the top shelf to add a touch of life.
The biggest mistake people make with small entryways is overcrowding the surface. You want to leave some breathing room around the vases so the mirror can actually catch the light and make the space feel larger.
### Lighting Tricks That Make a Small Entryway Feel Bigger
Light is currency in a small hallway, and this is where my advice might veer into what you actually should do based on your wiring. If you are a renter like me, you might not be able to hardwire new lights into the ceiling. I swapped the existing boob light fixture with a simple flush mount track system that allowed me to point the light directly at the wood slat wall.
That uplighting effect on the slats creates shadow lines that give the illusion of more depth. Pair that with the warm glow of the curved mirror LEDs, and you have a layered lighting scheme that makes an 8-foot-wide entryway feel like a much grander space. Do not underestimate the power of a dimmer switch here, it enables you to keep it bright for the morning rush and warm for the evening.
### Small Entryway Ideas for Renters and Tight Spaces
Look, if you’re renting, you might be scared off by the idea of glueing wood planks to the wall. I get it, security deposits are expensive. But you can achieve this exact wood slat wall look using peel-and-stick wallpaper or acrylic panels that mimic the slats. Honestly, the only reason my project took a full weekend is because I decided to paint the walls first.
If your entryway is tiny, the number one rule is to think vertical. A tall mirror that reaches up to the ceiling makes the ceiling look higher, and taking the slats all the way up creates a continuous line that visually stretches the wall. Also, consider swapping out your entryway rug for a runner that runs parallel to the slats to push the eye forward.
### What I Learned From This DIY Entryway Makeover
My biggest takeaway from this project is that patience really is the most important tool you can have. The first time I installed the LED lights for the mirror, they were slightly crooked and it drove me crazy. I had to unstick them and redo it, which took less time than I feared.
And honestly, the most surprising thing was how much the dried flowers and the small decorative items mattered. Without them, the floating console looks like a random piece of wood on the wall. With them, it looks like a designer installed a custom piece of furniture. It really is the styling that sells the expensive look, not the expensive materials.
I hope this gives you the confidence to tackle your entryway, even if your space is small and your budget is lean. Trust the process, measure twice, and cut once. You can totally make this happen in your own home.
Leave a Comment